Honda K20 Engine Build
One of our regular clients has brought his CTR into us for a Honda K20 engine build, due to its gradually increasing oil consumption and decreasing performance.
This engine has done 175,000 miles in total which is 145,000 very hard miles (every day use and track days (including Nurburgring)) in the two years since we tuned the ECU to wring every last bit of power out of her.
Apart from the normal wear and tear related to piston rings and valve guides etc, the engine components are in remarkably good condition!
The areas that normally suffer if anything related to the tuning is awry, are the connecting rod bearings and piston crowns/ring lands.
Here’s the engine just after removal from the car, and prior to disassembly.
It’s provided excellent service throughout 175,000 miles, the last 145,000 being very hard use in tuned form.
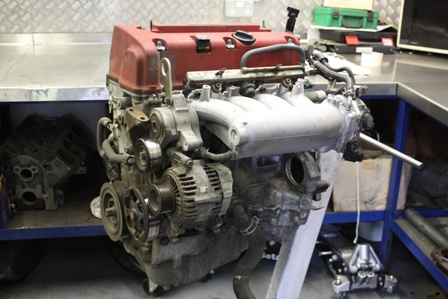
Old Honda K20 engine prior to rebuild
Engine disassembly is normally a messy job!

Stripping the engine down
The valve train is in great shape, and is testament to good and regular servicing.

This engine is on its second cam chain, and even this one is approaching the end of its service life. We’ve seen stretched chains cause unwanted valve timing variations, and even jumped teeth.

This engine is coming to the end of life for its second cam chain.
As part of this Honda K20 engine build the cylinder head is removed exposing the cylinder block deck face and piston crowns.
The build up of dark carbon deposits on the piston crowns is a result of heavy oil consumption which is the reason for the freshen-up.

The standard pistons show a build of carbon deposits as a result of heavy oil consumption.
One of the greatest risks to engine life after tuning, is detonation.
Detonation is evidenced by the appearance of erosion of the piston and cylinder head material. Here we can see that good practice in relation to ECU calibration has allowed this engine to serve the owner faithfully for 145,000 miles for racing and as a daily driver, without even a hint of detonation.

The pistons and connecting rods are removed from the cylinder block.
A common mistake that some tuners make is to use too much ignition advance which may not be sufficient to induce detonation but it still creates excessive and unnecessary loading on the pistons, rods, bearings and crankshaft pins. The first signs of this phenomenon appears on the “softest” components which are the big end bearings. Here, the bearings are in great shape.

The standard pistons, connecting rods and bearings
The cylinder block, crankshaft, oil squirter jets and main bearing girdle.

The crankshaft journals are fine and will require only a micro polish.

We’ve selected Cosworth racing pistons for this Honda K20 engine build application, which have the following features:
- Polished crowns to reduce carbon build-up, minimising the effects of hot spots.
- Offset pin bores to reduce engine noise.
- AAnti-detonation bands
- Xylan skirt coating improves bed-in and reduces frictional losses.
- Accumulator groove improves compressing ring sealing under high cylinder pressures.
- Very light weight reduces reciprocating mass
- High tensile strength aluminium forging with well designed ladder frame pin support, enhances structural rigidity at high load/rpm conditions.


Cosworth pistons are available in 86.00mm / 12:1 CR , 86.25mm / 12:1 CR and 86.5mm / 12:1 CR and can be bought from these links.
We’re using Cosworth connecting rods which have the following featres:
- Manufactured from high strength EN40 steel forgings for maximum strength.
- High tensile rod bolts
- H section with detailed CNC machining to optimise weight and strength
- Radial truss small end to optimise weight and strength

The Cosworth connecting rods can be seen and purchased here
When we do engine builds, we normally have the metal components such as fasteners etc plated. This is an inexpensive process which makes the egine look a whole lot better.

The cylinder block has been bored and honed to suit the new oversized Cosworth forged pistons.

The bores are measured for size, ovality and taper because it’s dangerous to assume that the boring has been carried out properly. We often have to reject cylinder boring work that hasn’t been completed to our satisfaction.
When working to tight tolerances, the correct piston to bore clearance is critical. Cosworth recommend a bore clearance as low as 60 microns, so any tight spots may lead to a catastrophic seizure.

The engine build specifications are recorded to ISO9001 standards in case we need to rely on them at any time in the future.

Here are some of the engine components prior to being prepared ready for assembly.

The Cosworth components are very consistent but we still process the rods to ensure the rods are balanced end to end and the pistons are also balanced, all within 0.5 gramme.
The inside of the crank case prior to installation of the crankshaft.

The main cap girdle is very substantial in order to enhance the stiffness of the crankcase assembly and prevent crankshaft whipping.

More pictures of the Cosworth engine components


The main girdle is fitted to the cylinder block to ensure that the main bearing tunnel is within size and straight.


Cosworth Race Series main bearings are installed, the crankshaft is fitted to measure the clearances.


The crankshaft and main girdle has final fitment so it’s time to measure the big end bearing clearances.

The piston rings have been gapped, oil squirter jets modified, and piston/rod assemblies installed.


The first image is of the main studs being torqued up, and the second image shows the short block fully assembled with crankshaft, connecting rods, pistons and bearings.


We’re using the new Cosworth metal head gasket, which is available in 87mm /0.8mm, 87mm / 1.1mm and 90mm / 1.1mm

High tensile Cosworth head studs are used to maintain clamping pressures under extreme conditions.


It’s been a busy day for this TDI/Cosworth engine, so it’s time to get tucked into bed for the night.


The main cause of the heavy oil consumption was worn valve guides.
It’s difficult/impossible to buy replacement valve guides from Honda, but fortunately Toda Racing offer a set of heavy duty guides for the intake and exhaust which we know to work very well.


The valves were in remarkably good condition with no stem wear whatsoever, so just as a matter of good practice we treated them to a very light reface on the seats. Cosworth racing inlet valves and exhaust valves are also available.

The cylinder head has had the new Toda Racing valve guides installed and the valve seats have been recut.


The valves have been lapped in and installed with Toda racing valve springs.

The new oil pump and original windage tray is installed.


The cylinder head is torqued down to the correct settings with an electronic torque wrench.


The rocker arms and shafts are installed ready for some Toda Racing A3 camshafts.

Toda Racing camshafts have been used successfully many times and are reputedly one of the best manufacturers available. We’ve selected the A3’s for this application which offer a useful spread of torque throughout the engine operating speed range.


Here we’re torquing down the cam carrier caps in order to check the bearing clearances.


It’s best practice to check all bearing clearances. You know what they say about assumptions!

The Toda A3’s have final fitment together with an uprated Toda cam chain for improved reliability. The front cover is now safely installed too.


We’re using a Toda Racing flywheel to reduce the rotating mass and improve engine response, with a standard Honda clutch.


We’ve applied lush new coats of wrinkle finish paint for the valve cover.


The Honda K20 engine build is installed and running!


We hope you enjoyed reading about this Honda K20 engine build. The car is away now running the engine in, and will return to us for tuning and servicing in due course.